Hp Deskjet 3050a Software Download for Mac
Z7_3054ICK0KGTE30AQO5O3KA30N0
HP Deskjet 3050A Printers - Setting Up the Printer Hardware
Introduction
This document explains how to ready the physical parts of the product. Complete these steps before y'all install the production software on your figurer.
Setting up the All-in-I
Follow these steps in society.
circumspection:Do Non connect the USB cablevision now. If you demand a USB cable to connect the product to the computer, yous will be prompted to connect it at the correct fourth dimension during software installation.
Pace 1: Unpack the All-in-One
-
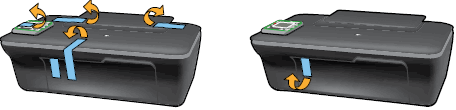
Remove the tape and cardboard from the exterior of the printer.
Figure : Remove the tape from the outside of the printer
-
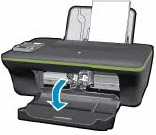
Open up the front end access door, open the cartridge admission door, so remove the tape and cardboard from inside the printer.
Figure : Remove the tape and cardboard from inside the printer

-
Close the cartridge access door.
Pace two: Check the contents of the box
The contents might vary by country/region. Run into the packaging for a list of items shipped in the box.
Stride three: Connect the power string and adapter
-
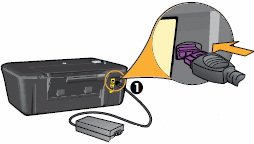
Connect the power cord to the dorsum of the printer.
Figure : Connect the power string into the dorsum of the printer
-
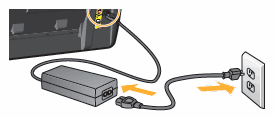
Connect the power cord to the power supply, and and so into a ability outlet in the wall.
Figure : Connect the power string to the power supply, then into a power outlet in the wall
Step four: Lift the command console display
Elevator the command console brandish.
Figure : Lift the control panel screen

Step five: Plough on the power
Press the Power push button to turn on the printer.
Figure : Plow on the printer

Stride six: Select the language and region
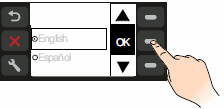
When the printer is first turned on, the control panel prompts you to select the language and the region. Use the following steps to set the default linguistic communication and state/region for your printer.
-
Press the button (
 ) next to the Downwards Arrow (
 ) to scroll through the languages.
 -
Press the push (
) next to OK, and so select Yes to confirm the language choice. The State/Region screen displays. -
Press the push button (
) next to the Down Arrow () to curlicue through and select your desired region. -
Press the button (
) next to OK, and so select Yes. A 'Cheers for using HP' bulletin displays. -
Press the button (
) next to OK, and the cartridge installation process begins.Figure : Select your linguistic communication and region from the printer control panel
Step seven: Install the cartridges
-
Open the cartridge access door. The railroad vehicle moves to the center of the printer. Wait until the carriage is idle and silent earlier standing.
Figure : Open the cartridge access door
-
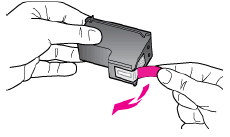
Remove the new cartridge from its packaging, and so carefully pull the pink pull tab to remove the plastic tape.
caution:
Practice not bear on the copper-colored contacts or ink nozzles. Besides, donot re-tape the cartridges. Doing and then can event in clogs, ink failure, and badelectrical connections.
Figure : Remove the plastic record
-
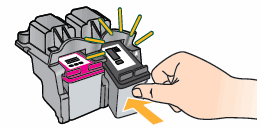
Hold the cartridge by its sides with the nozzles toward the printer, and then insert the cartridge into its slot.
-
The tri-color cartridge goes in the slot on the left.
-
The blackness cartridge goes in the slot on the right.
Figure : Insert the cartridge into its slot

-
-
Push the cartridge forward into its slot until information technology snaps into place.
Effigy : Snap the cartridge into identify
-
Repeat these steps to insert the other cartridge.
-
Shut the cartridge access door.
Effigy : Close the cartridge access door

Step viii: Load plain paper

-
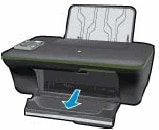
Raise the input tray.
Figure : Enhance the input tray

-
Pull out the tray extender.
Figure : Pull out the tray extender
-
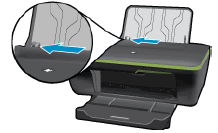
Slide the paper width guide to its outermost position.
Figure : Slide the paper width guide outward
-
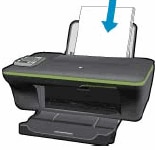
Load the paper into the input tray, and then slide the paper width guide in to rest against the border of the newspaper.
Figure : Load plainly, white paper into the input tray
-
Press the button (
) next to OK to print an alignment page.
Stride nine: Align the cartridges
-
Lift the scanner lid.
-
Identify the alignment page with the printed-side down on the right-front corner of the scanner drinking glass. See the engraved guide next to the scanner glass for help loading the alignment page.
Figure : Place the alignment page on the scanner glass

-
Close the scanner lid.
Figure : Close the scanner lid

-
Printing the push (
) next to OK. The scanner scans the folio and completes the alignment procedure.
Getting started with ePrint
Now you can stay connected and productive on the go with ePrint. ePrint lets you print directly to your ePrint-enabled HP printer using a smartphone, notebook, or other mobile device. For additional data related to setting upwardly and using ePrint, click the link provided.
Hp Deskjet 3050a Software Download for Mac
Posted by: jeanchadoicy.blogspot.com
Post a Comment